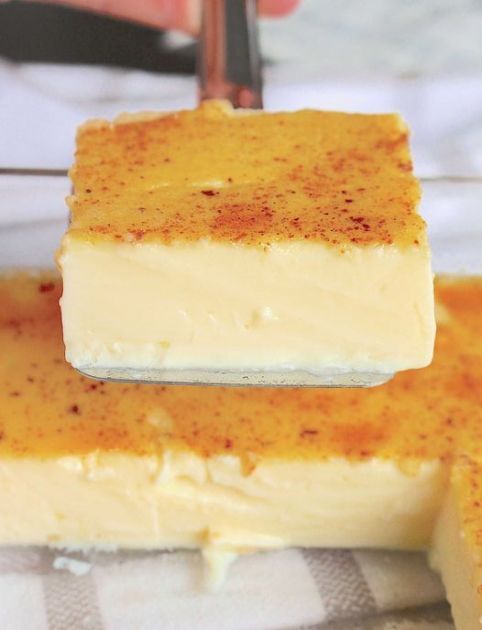
There's something so nostalgic about a perfectly baked egg custard – that silky, jiggly texture and gentle sweetness always reminds me of my grandmother's kitchen. This recipe has been my go-to for years, and I'm excited to share it with you.
Advertisements1
I've tested this custard countless times to get the ratios just right. The key is a gentle water bath and low oven temperature, which ensures a smooth, creamy custard without any curdling. Trust me, once you master this, you'll feel like a pro.
Whether you're a beginner or a seasoned baker, this recipe is forgiving and rewarding. Let's dive in!
Why You'll Love This Recipe
About the Ingredients
2 cups (480ml) whole milk
Whole milk gives the custard richness. For a lighter version, use 2% or a mix of milk and cream.
1/2 cup (100g) granulated sugar
Adjust sugar to taste. You can use honey or maple syrup, but reduce liquid slightly.
3 large eggs
Room temperature eggs blend better. If using extra-large, use 2 whole eggs plus 1 yolk.
2 large egg yolks
Yolks add richness and a beautiful yellow color.
1 teaspoon vanilla extract
Pure vanilla extract is best. You can also use vanilla bean paste or a split vanilla bean.
1/4 teaspoon salt
Salt balances sweetness and enhances flavor.
Freshly grated nutmeg (optional)
For a classic topping. Ground nutmeg works too.
Tips & Tricks
- Strain the custard mixture through a fine-mesh sieve before baking to remove any egg solids for a silky texture.
- Use a water bath (bain-marie) – it provides gentle, even heat and prevents curdling.
- Don't overbake! The custard should be set around the edges but still jiggle slightly in the center when done.
- Let the custard cool gradually to room temperature, then refrigerate – this helps it set and improves texture.
Pro Tips
Step-by-Step Instructions
1. Preheat Oven
Preheat your oven to 325°F (163°C). Place a kettle of water on to boil – you'll need it for the water bath.
2. Warm the Milk
In a medium saucepan, warm the milk over medium heat until it's steaming but not boiling (about 180°F/82°C). Remove from heat and set aside.
3. Whisk Eggs and Sugar
In a large bowl, whisk together the eggs, egg yolks, sugar, and salt until well combined and slightly frothy. Don't overmix to avoid air bubbles.
4. Temper the Eggs
Slowly pour about 1/2 cup of the warm milk into the egg mixture while whisking constantly. Then gradually add the rest of the milk, whisking until fully combined.
5. Add Vanilla and Strain
Stir in the vanilla extract. Strain the mixture through a fine-mesh sieve into a large measuring cup or bowl with a spout for easy pouring.
6. Fill Ramekins
Place 6 (6-ounce) ramekins in a deep baking dish. Divide the custard mixture evenly among the ramekins. Sprinkle with nutmeg if using.
7. Create Water Bath
Carefully pour the hot water from the kettle into the baking dish, about halfway up the sides of the ramekins. Be careful not to splash water into the custards.
8. Bake
Bake for 35-40 minutes, until the custards are set around the edges but still slightly jiggly in the center. The internal temperature should reach 175°F (80°C).
9. Cool and Serve
Remove the baking dish from the oven and let the custards cool in the water bath for 10 minutes. Then transfer to a wire rack to cool completely. Serve warm, at room temperature, or chilled.
Delicious Variations
Flavor twist
Add 1 teaspoon of lemon zest or orange zest for a citrusy note.
Spiced custard
Replace vanilla with 1/2 teaspoon of cinnamon and a pinch of cardamom.
Chocolate custard
Melt 2 ounces of dark chocolate into the milk before tempering.
How to Store Classic Egg Custard Recipe
Refrigerator
Store custards covered in the fridge for up to 3 days.
Freezer
You can freeze baked custards for up to 1 month. Thaw overnight in the fridge.
Reheating
Reheat gently in a 300°F (150°C) oven for 5-10 minutes, or microwave on low in 15-second bursts.
Frequently Asked Questions
Q: Why is my egg custard watery?
A watery custard usually means it was underbaked or the ratio of eggs to liquid was off. Make sure you bake until the center is just set but still jiggly, and use the correct egg-to-milk ratio.
Q: Can I make egg custard without a water bath?
Yes, you can bake without a water bath, but the custard may be less smooth and more likely to curdle. If you skip it, reduce the oven temperature to 300°F (150°C) and check doneness earlier.
Q: How do I know when egg custard is done?
The custard is done when the edges are set but the center still jiggles slightly when you gently shake the ramekin. A knife inserted near the center should come out clean.
Q: Can I use a different milk like almond or oat?
Yes, you can use non-dairy milks, but the texture may be slightly less creamy. Choose an unsweetened variety and consider adding a tablespoon of cornstarch to help set.
I hope you enjoy this classic egg custard as much as I do. Try it this weekend and share your results with me – I'd love to hear how it turns out! Here's to small steps, together.
Classic Egg Custard Recipe
Classic Egg Custard Recipe: a velvety, lightly sweet baked custard with a silky texture, perfect for a comforting dessert or elegant brunch.
🧂 Ingredients
- 2 cups (480ml) whole milk
- 1/2 cup (100g) granulated sugar
- 3 large eggs
- 2 large egg yolks
- 1 teaspoon vanilla extract
- 1/4 teaspoon salt
- Freshly grated nutmeg (optional)
📋 Instructions
- 1Preheat Oven — Preheat your oven to 325°F (163°C). Place a kettle of water on to boil – you'll need it for the water bath.
- 2Warm the Milk — In a medium saucepan, warm the milk over medium heat until it's steaming but not boiling (about 180°F/82°C). Remove from heat and set aside.
- 3Whisk Eggs and Sugar — In a large bowl, whisk together the eggs, egg yolks, sugar, and salt until well combined and slightly frothy. Don't overmix to avoid air bubbles.
- 4Temper the Eggs — Slowly pour about 1/2 cup of the warm milk into the egg mixture while whisking constantly. Then gradually add the rest of the milk, whisking until fully combined.
- 5Add Vanilla and Strain — Stir in the vanilla extract. Strain the mixture through a fine-mesh sieve into a large measuring cup or bowl with a spout for easy pouring.
- 6Fill Ramekins — Place 6 (6-ounce) ramekins in a deep baking dish. Divide the custard mixture evenly among the ramekins. Sprinkle with nutmeg if using.
- 7Create Water Bath — Carefully pour the hot water from the kettle into the baking dish, about halfway up the sides of the ramekins. Be careful not to splash water into the custards.
- 8Bake — Bake for 35-40 minutes, until the custards are set around the edges but still slightly jiggly in the center. The internal temperature should reach 175°F (80°C).
- 9Cool and Serve — Remove the baking dish from the oven and let the custards cool in the water bath for 10 minutes. Then transfer to a wire rack to cool completely. Serve warm, at room temperature, or chilled.

Maya writes about sustainable living and zero-waste practices, focusing on small, actionable swaps for everyday routines. She tests products and shares what actually works for busy households.